
How to Pluck a Wig
Contents
hide
Achieve a Natural, Flawless Hairline with Expert Wig Plucking
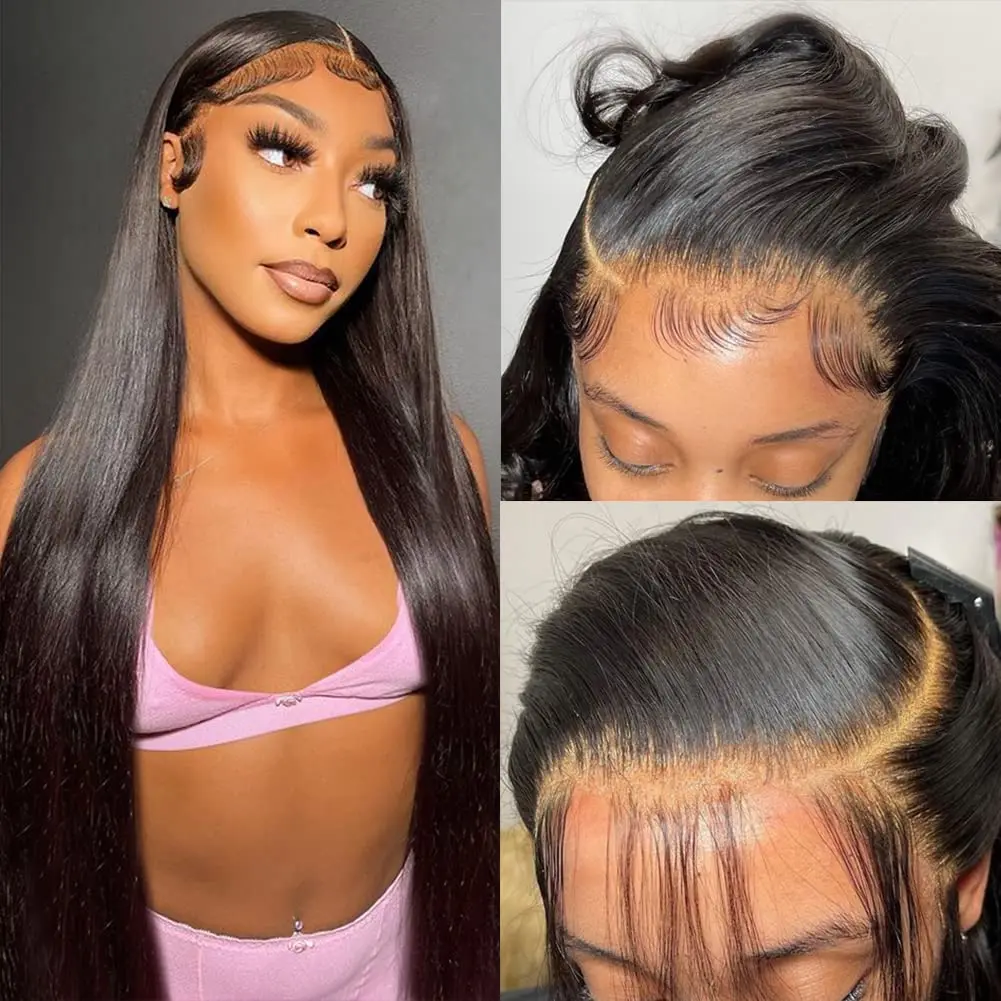
A high-quality wig offers unparalleled versatility and protection for natural tresses. But even luxurious units can look unnaturally severe without the right finishing techniques. Plucking remains the crucial final step to craft realistic, seamless hairlines. How to pluck a wig?This delicate process adds dimension and softness for an utterly convincing style.
Master the proper plucking methods to transform any wig into an undetectable, flawless beauty piece.
Gather Essential Plucking Tools
How to pluck a wig?Before delving into plucking intricacies, assemble the correct equipment. These core tools allow for precision, control, and efficiency when shaping hairlines to perfection.
Invest in a quality pair of ergonomic, sharp wig plucking tweezers designed for this very purpose. Look for slanted styles with a precise, even grip that feel comfortable during extended use.
Equip a bright, adjustable led lamp or magnifying lamp to illuminate every hairline detail clearly. Adequate lighting proves critical yet often overlooked.
Employ a flexible wig grip or stand to stabilize units securely while working. This frees up both hands for meticulous plucking and styling.
Stay organized with a large terry cloth towel or mat to contain shedding hairs and keep the area tidy. Have a gentle brush and tape roller on standby for cleanup.
Establish the Front Hairline First
Map out the desired hairline shape by first establishing its front section on the wig cap. This involved hairline forms the foundation for subsequent sides and nape.
Consult inspiration photos matching the client’s desired density and aesthetic. Baby hairs, wispies, and the peak point differ for Bohemian, classic, geometric, or natural styles.
Use tweezers to very carefully pluck out individual strands in an arc formation across the front edge. Pay special attention to shaping peaks, corners, and curves accurately.
With each pluck, carefully inspect the hair to ensure it releases smoothly and completely from the knotted base. Work in small, symmetrical sections and cross-check balance often.
Create Lifelike Sides and Nape
Once the front guide establishes the initial hairline, follow through by plucking soft shapely sides and a realistic nape area. These subtle contours provide dimension and movement.
For side sections, continue plucking in short arched motions creating soft, wispy edges. The sideburn area demands extra delicacy and precision.
At the nape, pluck vertically in clean lines tilting strands slightly inward. Maintain even spacing, avoiding sparser holes or overly dense patches. This nape area should showcase a softer, airier quality.
For all areas, follow the wig’s natural hairline growth patterns. Never yank or pull at extreme angles that could dislodge knotted strands prematurely. Continually brush away loose shedding.
Incorporate Authentic Baby Hair
For additional ultra-natural realism, incorporate delicate, sheer “baby hair” along the final hairline’s perimeter. This framing softens and diffuses any harsh edges or lines.
Carefully pluck minuscule clusters of short, downy strands both above the forehead and around sideburn areas. Layer these wisps over thicker hairline strands in varying lengths.
Truly skilled stylists create 3D-like gradation effects with plucking tension. Increased plucking along the hairline perimeter creates a sheer, see-through illusion mimicking real new growth.
For flexible styling, separate and coil longer baby hairs with an ergo-pencil end tool. Mist with lightweight hairspray to set shapes before handling.
Fine-Tune Details Through Strategic Plucking
To establish supremely natural hairlines, refined plucking techniques prove essential. These meticulous details elevate results from basic to exquisite.
Vary the density, thickness, and length of plucked areas to capture organic inconsistencies. Our hairlines feature gradual changes rather than uniformity.
For sparse sections, use a plucking hook or vented plucking needle to delicately dial back bulkiness. These minimally invasive tools remove excess hair more precisely.
Add pluckable reinforcement threads or meshes in spots that feel overly thin after sculpting. This security base prevents developing holes prematurely from rigorous styling.
Splicing techniques help blend varying tones and textures seamlessly. Hand-pluck sections where colors or curl patterns converge for smooth transitions without demarcations or lines.

Style and Customize the Final Look
With plucking complete, finesse and set the hairline using trusted styling methods. Hairspray, wrapping techniques, and careful detailing establish wearable, lasting results.
To build shape memory, saturate hairline with flexible styling spritz. Then delicately wrap shaped areas against the wig cap using netting or tissue paper.
Add extra staying power with a wig sealer or styling gel along lacefronts and perimeters. This adherent coating locks strands along defined edges.
Customize details further by curving and teasing tendrils with miniature styling chopsticks or edge tools. Create illusions of volume, lift, or swirling movement through calculated separation and layering.
Finally, deploy a wig clamp or mesh to gently compress the completed look. This resilient netting holds every hair solidly in place until wear.
Maintain Meticulous Upkeep
As with real hair, upkeep proves critical to keep plucked wigs fresh. Frequent brushing removes shed strands and refreshes shapes between salon visits.
Curling or flat iron touch-ups periodically refresh waves or smoothness along perfected hairlines. Re-mist flexible hairspray to revive hold and sheen.
Over time, normal wear creates sparser areas requiring a professional replucking. Most stylists recommend a total repluck every 6-8 weeks to maintain flawless density.
Avoid sleeping or storing wigs with compressed hairlines. The prolonged pressure flattens hard-earned lift and volume. Always reset styling before extended wear.
Trust the Hands of Experts
While plucking looks deceptively simple, mastering it requires immense dexterity, artistry, and skill. Precision is paramount to preserve wig longevity.
Certified professionals undergo extensive training specific to wig construction, hair properties, and realistic hairline mapping techniques. Their discerning eyes calibrate plucking depth and angles for jaw-dropping results.
Don’t settle for one-size-fits-all wig hairlines. Top stylists pluck each piece to complement the wearer’s unique bone structure, hair growth patterns, and aesthetic goals.An experienced hand delivers hairlines tailored to personal preferences. From dramatic peaks to delicately diffused soft tendrils, true plucking artisans create 100% personalized, natural-born looks.
In conclusion, learning how to pluck a wig is an essential skill for achieving a natural and flawless look. By carefully thinning out the hairline and parting, you can create a more realistic and scalp-like appearance. This technique allows for customization and a personalized fit that complements your facial features.
With attention to detail and practice, you can master the art of plucking a wig to achieve the desired density and hairline shape. Remember to take your time, use gentle motions, and regularly assess the progress to achieve the ideal balance. The proficiency in wig plucking can significantly enhance the overall appearance and comfort of wearing a wig.
Personalizing Your Wig
Once you’ve mastered the basics of plucking a wig, personalizing it becomes easier. Consider customizing the wig further by adding additional layers or even highlights. Dyes and temporary color sprays can add dimension to your wig, making it look even more natural and unique to you.
Cutting or trimming the wig to suit your face shape can further personalize the look. If you’re comfortable, you can also attempt to alter the wig’s style using heat tools. However, always ensure the wig is heat-resistant if you decide to use this method. Personalizing your wig transforms it from a generic hairpiece to an integral part of your personal style.

The Importance of Patience
Patience is vital when plucking a wig. Rushing through the process often results in mistakes that are difficult to fix. Plucking a wig to look natural takes time and practice, so don’t be discouraged if it doesn’t turn out perfect on the first attempt. Each time you pluck wigs, you’ll get better and develop a keener eye for detail.
Allow yourself plenty of time and take breaks to avoid fatigue. Having a steady hand and a clear mind helps you work more effectively. Patience leads to better results, and over time you’ll become adept at customizing your wigs to achieve the perfect look.
Consulting Professionals
If you’re new to plucking wigs and feel overwhelmed, consulting a professional can be incredibly beneficial. Many wig shops offer customization services where experts can pluck the wig for you, ensuring a natural result. Observing a professional plucking your wig can also provide you with tips and techniques to use at home.
Workshops and tutorials are also available for those who prefer a hands-on approach. Learning from professionals gives you confidence and skills that you can apply independently. Consulting a professional ensures you start with the correct foundation and reduces the risk of common mistakes.
Final Thoughts
How to pluck a wig? In 2024, mastering the art of plucking a wig can elevate your hairstyling game, giving your wig a more natural and realistic appearance. Plucking wigs involves carefully tweezing individual hairs from the hairline and parting area to create a softer, more natural look. When plucking a wig, you’ll need a pair of high-quality tweezers, a mannequin head to secure the wig, and a comb to help define the sections you’re working on. Make sure to pluck sparingly and step back frequently to check your progress, as over-plucking can lead to an uneven hairline. By understanding what to use to pluck a wig and practicing patience, you can achieve professional results that enhance your overall look in 2024.

